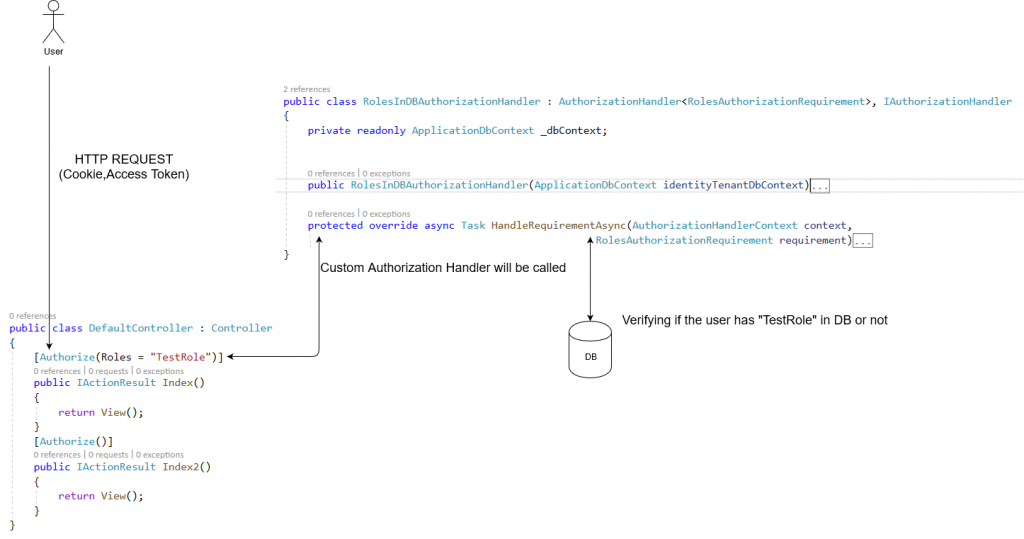
If you are building a solution that supports roles based authorization in ASP.NET CORE 2.2, most probably you are using ASP.NET Identity.
You secure each action method with [Authorize] attribute and you set the roles according to the business logic you have.
In this blog post, I will explain how to create a custom authorization handler to verify user’s roles from the database.
This the scenario that we want to solve:
- A user logged in to the system
- The system generated claims that contain roles assigned to the user. e.g ( John has (Role1, Role2)
- Claims will be embedded in a cookie or an access token based on the authentication scheme.
- The admin user updated the unassigned the Role2 from John. which mean the cookie or the access token has the wrong claims.
- John is still logged in to the system, the secure cookie contains two claims (Role1, Role2) and he is still able to access the system according to claims in the cookie.
The reason is that the default behavior of Authorization will compare the required roles of [Authorize(Role=
To solve this problem, you can implement your own Authorization Handler in ASP.NET CORE and inject it in the DI container.

To do that you need two steps :
1- Create a new implementation of IAuthorizationHandler
In my
The parent class support passing generic Requirement class. I want to validate based on Roles so there is already a RolesAuthorizationRequirement class for that purpose.
public class RolesInDBAuthorizationHandler : AuthorizationHandler<RolesAuthorizationRequirement>, IAuthorizationHandler
    {
        private readonly ApplicationDbContext _dbContext;


        public RolesInDBAuthorizationHandler(ApplicationDbContext identityTenantDbContext)
        {
            _dbContext = identityTenantDbContext;
        }

        protected override async Task HandleRequirementAsync(AuthorizationHandlerContext context,
                                                       RolesAuthorizationRequirement requirement)
        {
            if (context.User == null || !context.User.Identity.IsAuthenticated)
            {
                context.Fail();
                return;
            }

            var found = false;
            if (requirement.AllowedRoles == null ||
                requirement.AllowedRoles.Any() == false)
            {
                // it means any logged in user is allowed to access the resource
                found = true;
            }
            else
            {

                var userId = context.User.GetUserId();
                var roles = requirement.AllowedRoles;
                var roleIds = await _dbContext.Roles
                                                    .Where(p => roles.Contains(p.Name))
                                                    .Select(p => p.Id)
                                                    .ToListAsync();

                found = await _dbContext.UserRoles
                                        .Where(p => roleIds.Contains(p.RoleId) && p.UserId == userId)
                                        .AnyAsync();
            }

            if (found)
            {
                context.Succeed(requirement);
            }
            else
            {
                context.Fail();
            }
        }
    }
2- Add The New Authorization Handler To DI Container
what we will do is injecting a new IAuthorizationHandler implementation that verifies roles from Db.
In startup.cs, add the following code to ConfigureServices
services.AddTransient<IAuthorizationHandler, RolesInDBAuthorizationHandler>();
ASP.NET core supports roles-based and claims-based authorizations. both models use a requirement. requirement handler and a preconfigured policy.
so you can also check Policy-based authorization to get more info about ASP.NET Core authorization models.
Performance Challenge
After implementing the solution, there will be an extra query that hits the database in each HTTP request to validate the
To avoid this you can cache the user’s permission in a Redis memory cache. but you have to update the memory cache whenever the admin updates the user’s roles.
Conclusion!
You implement IAuthorizationHandler then you inject the class in ConfigureServices in the