This post contains affiliate links, which means I’ll receive a commission if you purchase through my links, at no extra cost to you. You can always read the disclaimers for more info.
Last update is 3th May 2021
Identity Management is an essential part of any solution. In this post, I will build an Identity Service by using IdentityServer4 and ASP.NET Identity together.
Any modern application contains many components: front-ends, back-ends, and third-party APIs. How should you implement authentication and authorization?
What Is ASP.NET Core Identity
ASP.NET Core Identity is a membership nuget package that can be used in any ASP.NET project Type: MVC, WebForms, WebAPI. It has the main following capabilities:
- Easily customize the user profile data.
- Storing the users’ info in a persistence data store using Entity Framework Code First.
- Unit testability
- Restrict access by roles
- Claims-based provider
You can also check this ASP.NET Core Identity demo.
So ASP.NET Identity is Authentication and Authorization provider. Why do we need IdentityServer4?
ASP.NET Identity can receive a security token from a third-party login provider like Facebook, Google, Microsoft and Twitter. But If you want to issue a security token for a local ASP.NET Identity user you need to work with a third-party library like IdentityServer4, OpenIddict.
If you do a little research, you will find IdentityServer4 is the most common.
What Is IdentityServer4
IdentityServer4 is an OpenID Connect and OAuth 2.0 Framework for ASP.NET Core. It is a nuget package that is used in the asp.net core middle ware to enable using the login/logout, token/authorize and other standard protocol endpoints.
Note
As mentioned in IdentityServer4 documentation, IdentityServer4 with Apache-2.0 License will be maintained with bug fixes and security updates until November 2022. If you want to get the newer versions in the future, Duende IdentityServer is available under FOSS (RPL) and commercial license. Only Development and testing will be free.
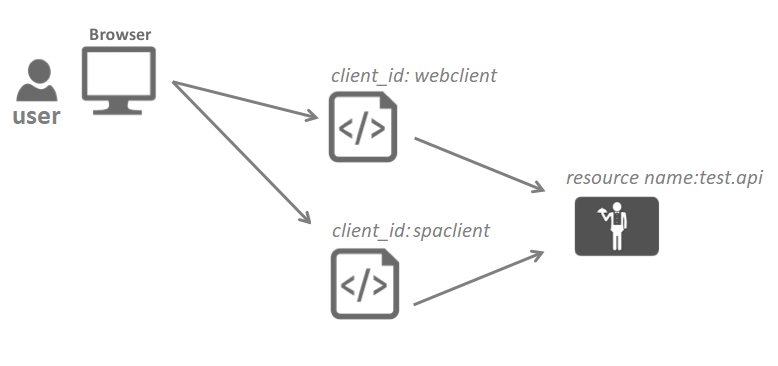
To have a good understanding of the architecture, I think you better review the main terminology that will be used during this post:
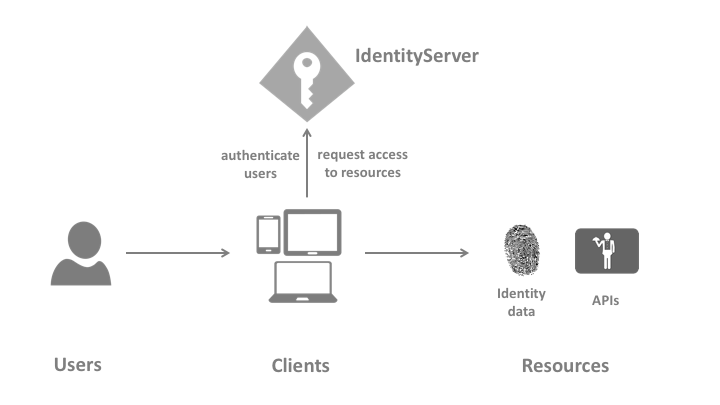
- User: a human (me and you) that is using a client
- Client: it’s the software like web-browser, mobile app and any code that requests a resource.
- Resources: what you want to protect using identityserver4
- Access Token: it is the token that is used by a client to access the API resource.
- Refresh Token: each access token has an expiry date. The refresh token is used to get a new access token without the user interaction. The client should be allowed to do that by setting
AllowOfflineAccess to true in client configuration in IdentityServer4. - Grant Type: it is the type of interaction between the client and the IdentityServer. based on your client you should choose the suitable grant type.
Building Identity Service
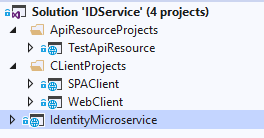
You can see the following steps in the IdentityServer4 docs for more details. The last output will be a visual studio 2019 solution that contains:
- IdentityMicroservice (IdentityServer4 and ASP.NET Identity)
- ClientsProjects\SPAClient (Single Page Application Client)
- ClientsProjects\WebClient (ASP.NET MVC Client)
- ApiResrouceProjects\TestApiResource (Represents a secured resource)
1- Identity MicroService Project Startup
This is the project that is responsible for securing APIs, configuring your clients and storing users’ data. You can see the source code on Github.
Here are the steps:
Create a new ASP.NET CORE Web Application (Empty) project.

Install IdentityServer4 Templates by executing the following command:
dotnet new -i IdentityServer4.Templates
Add IdentityServer4 and its QuickStart UI Files along with ASP.NET Identity Nuget packages to the project by running the command:
dotnet new is4aspid --force
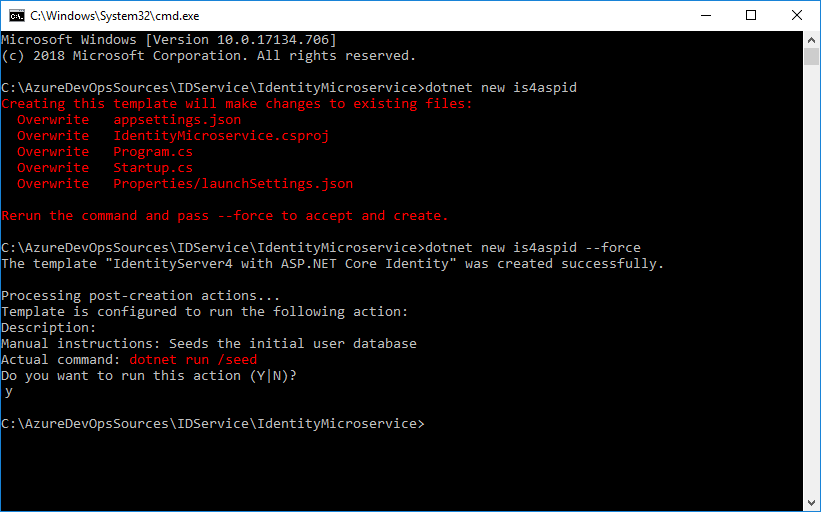
In .NET Core 2.2:
After running the command mentioned above, make sure to change the project to .NET 2.2 and update the Nuget packages, because executing the command will affect the .csproj file and might downgrade the .net core version, based on the IdentityServer4.Templates version.
You may need to update the following Nuget packages by modifying csproj file directly:
"Microsoft.VisualStudio.Web.CodeGeneration.Design" Version="2.2.3"
"Microsoft.EntityFrameworkCore.Tools" Version="2.2.4"
In .NET Core 3.1
After running the command mentioned above, make sure to change the project from .NET Core 3.0 to .Net Core 3.1 and update the IdentityServer4 Nuget packages from 3.0 to 3.1, because executing the command will affect the .csproj file and might downgrade the .net core version based on the IdentityServer4.Templates version.
You will update the following Nuget packages:
"Microsoft.EntityFrameworkCore.Tools" Version="3.1.0"
You need to remove “Microsoft.AspNetCore.App” nuget package because it’s not needed in .NET Core 3.1. This will cause error in ApplicationDbContext and Startup.cs because of missed Nuget packages so install:
- Microsoft.AspNetCore.Identity.EntityFrameworkCore 3.1.0
- Microsoft.AspNetCore.Diagnostics.EntityFrameworkCore 3.1.0
You will also get a warning message for IHostingEnvironment because this interface has a replacement in .NET Core 3.1 so you should use IWebHostEnvironment.
In ConfigureServices() in startup.cs file add this:
//services.AddMvc().SetCompatibilityVersion(Microsoft.AspNetCore.Mvc.CompatibilityVersion.Version_2_1);
services.AddControllersWithViews();
In Configure() in startup.cs file, you need to modify this:
app.UseRouting();
	    // Block 4:
            //  UseIdentityServer include a call to UseAuthentication
            app.UseIdentityServer();
            app.UseAuthorization();

            //app.UseMvcWithDefaultRoute();
            app.UseEndpoints(endpoints =>
            {
                endpoints.MapControllerRoute(
                    name: "default",
                    pattern: "{controller=Home}/{action=Index}/{id?}");
            });
After that, you can build the project to make sure that it’s running.
2- Configuring Identity MicroService Project
The main files you should review and modify:
- Config.cs
- Startup.cs
Define your resources and clientS
IdentityServer4 gives two options to configure. You can use the InMemory Configuration or Use Database storage. In this example, we will use InMemory for the sake of brevity.
In config.cs file you will define the API resources you want to protect and clients that the user will use to access its resources. this file will be used in the next step add the middleware in Startup.cs
In your real scenario project, you need to use the database configuration. IdentityServer4 has ready implementation for SQL Server using Entity Framework Core.
// Block 1: All APIs, I want to protect in my system
        public static IEnumerable GetApis()
        {
            return new ApiResource[]
            {
                new ApiResource("identity.api", "Identity API"),
                new ApiResource("test.api","Test API")
            };
        }
        public static IEnumerable GetClients()
        {
            return new[]
            {
                //Block 2:  MVC client using hybrid flow
                new Client
                {
                    ClientId = "webclient",
                    ClientName = "Web Client",
                    RequireConsent = false,
                    AllowedGrantTypes = GrantTypes.HybridAndClientCredentials,
                    ClientSecrets = { new Secret("49C1A7E1-0C79-4A89-A3D6-A37998FB86B0".Sha256()) },
                    RedirectUris = { "https://localhost:5002/signin-oidc" },
                    FrontChannelLogoutUri = "https://localhost:5002/signout-oidc",
                    PostLogoutRedirectUris = { "https://localhost:5002/signout-callback-oidc" },
                    AllowOfflineAccess = true,
                    AllowedScopes = { "openid", "profile", "identity.api","test.api" }
                },
                //Block 3: SPA client using Code flow
                new Client
                {
                    ClientId = "spaclient",
                    ClientName = "SPA Client",
                    ClientUri = "https://localhost:5003",
                    RequireConsent = false,
                    AllowedGrantTypes = GrantTypes.Code,
                    RequirePkce = true,
                    RequireClientSecret = false,
                    AllowAccessTokensViaBrowser = true,
                    RedirectUris =
                    {
                        "https://localhost:5003/index.html",
                        "https://localhost:5003/callback.html"
                    },
                    PostLogoutRedirectUris = { "https://localhost:5003/index.html" },
                    AllowedCorsOrigins = { "https://localhost:5003" },
                    AllowedScopes = { "openid", "profile", "identity.api" ,"test.api" }
                }
            };
        }
Add IdentityServer4 and Asp.NET identity to middleware
Startup.cs class is called in the run time when the app starts. It has two methods. ConfigureServices() which register the services in DI container to be used in the applications. Configure() which configure the request’s processing pipeline.
        public void ConfigureServices(IServiceCollection services)
        {
            //TODO: change UseSqlite to UseSqlServer
            services.AddDbContext(options =>            options.UseSqlite(Configuration.GetConnectionString("DefaultConnection")));
            // Block 1: Add ASP.NET Identity
            services.AddIdentity()
                .AddEntityFrameworkStores()
                .AddDefaultTokenProviders();

            // Block 2: Add IdentityServer4 with InMemory Configuration
            var builder = services.AddIdentityServer(options =>
            {
                options.Events.RaiseErrorEvents = true;
                options.Events.RaiseInformationEvents = true;
                options.Events.RaiseFailureEvents = true;
                options.Events.RaiseSuccessEvents = true;
            })
                .AddInMemoryIdentityResources(Config.GetIdentityResources())
                .AddInMemoryApiResources(Config.GetApis())
                .AddInMemoryClients(Config.GetClients())
                .AddAspNetIdentity();
//some code is not mentioend here for the sake of brevity
            services.AddAuthentication();
        }
        public void Configure(IApplicationBuilder app)
        {
            if (Environment.EnvironmentName == "Development")
            {
                app.UseDeveloperExceptionPage();
                app.UseDatabaseErrorPage();
            }
            else
            {
                app.UseExceptionHandler("/Home/Error");
            }
            app.UseStaticFiles();
            app.UseRouting();
            // Block 4:
            //  UseIdentityServer include a call to UseAuthentication
            app.UseIdentityServer();
            app.UseAuthorization();
            //app.UseMvcWithDefaultRoute();
            app.UseEndpoints(endpoints =>
            {
                endpoints.MapControllerRoute(
                    name: "default",
                    pattern: "{controller=Home}/{action=Index}/{id?}");
            });
        }
After configuring the Identity service project, let’s move to API and Clients project configuration
3- Configuring Web Client Project
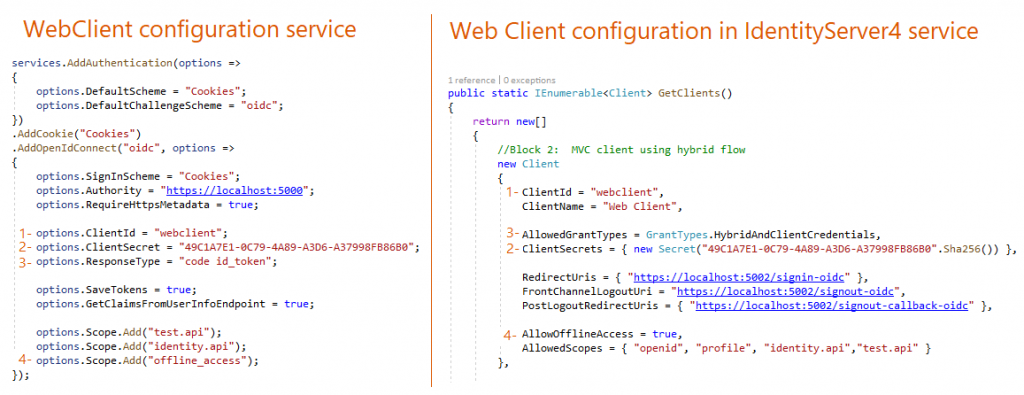
As you see on the left side of the image above, you can configure using OpenIdConnect by providing the client information that is already stored in Identity service.
Authority is the public link of the Identity Service. The Grant type is hybrid which represents both implicit and authorization code flow both. It is recommended grant type for server-side web application and mobile native application.
4- Configuring Single Page Application Project
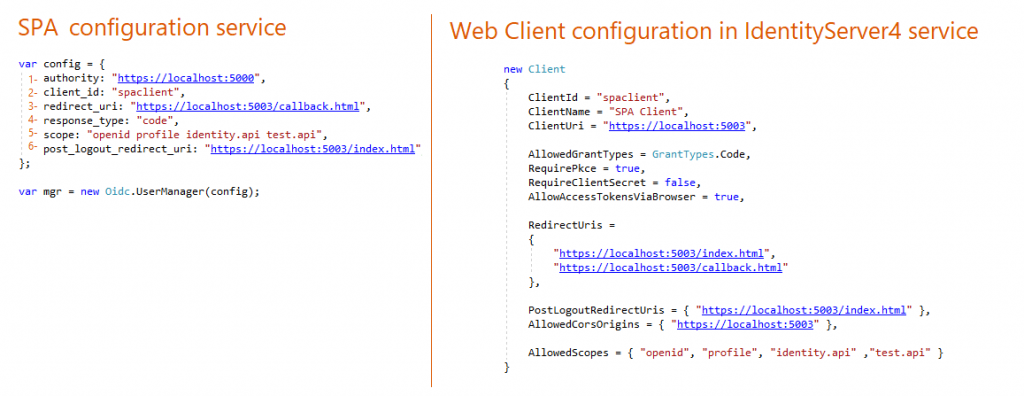
SPA is a client-side app. So we need first to install OpenIdConnect javascript library then include the file in the HTML page.
The Grant Type is authorization-code with PKCE.
5- Configuring Test API Resource Project
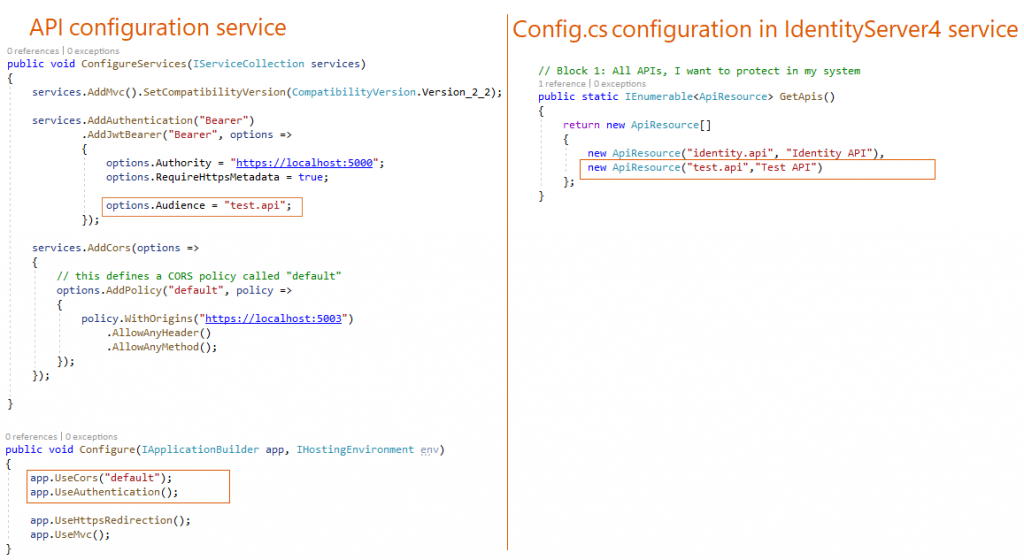
On the right side, I defined the API resource in the IdentityServer4 by a unique name and a label.
on the left side, I added the auth configuration to API resource startup class. Then I enabled the CORS to allow clients to make a call to the API.
In the configure() method, I used the Auth configuration and the CORS “default” configuration that I defined earlier. Kindly note that using authentication in the request pipeline is before using MVC.
Running the solution
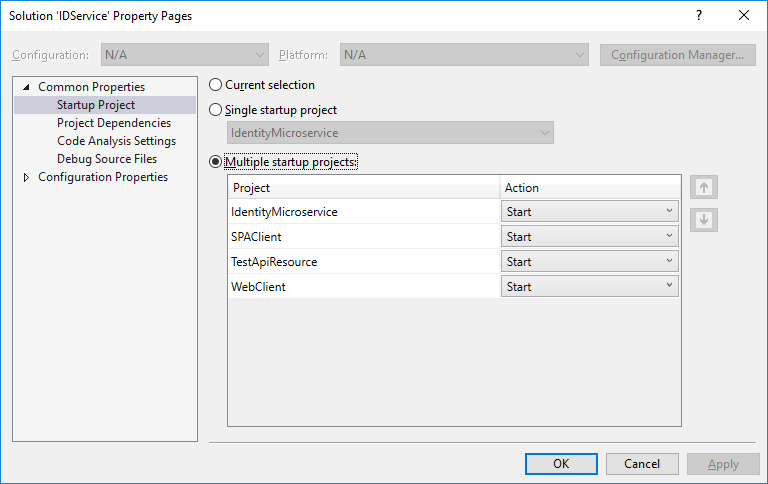
First, Run the solution with multiple startup projects. You can enable that on Solution’s Properties > Common Properties > Startup Project
When you clone the repo, you will get
I included launchsettings.json to keep using the same ports for each project that are used in
- Identity Microservice at port 5000
- Test Api Resource at port 5001
- Web Client at port 5002
- SPA Client at port 5003
Now you can run the solution, you can use the test user data that are seeded already from SeedData.cs to the SQLite database that is used for storing users’ data.
📌 References
I mainly depended on IdentityServer4 documentation to write this article. Another good resource is securing .net microservice. I would like also to mention that I learned a lot from courses like:
– ✔️✔️ Introduction to OAuth2, OpenID Connect and JSON Web Tokens (JWT) by Dominick Baier at PLURALSIGHT
Another useful courses with high good reviews are at Udemy:
– ✔️✔️The Nuts and Bolts of OAuth 2.0 👌👌
– ✔️✔️Secure .Net Microservices with IdentityServer4 OAuth2, OpenID 👌👌
Try the steps I mentioned in this post and tell me in a comment below
- What do you think about using IdentityServer4 with ASP.Net Identity?
- What other choices do you use for Authentication in your application?